Showing posts with label quilting tutorial. Show all posts

Sunday, February 26, 2012

Twist Along Week 3

Now that you have your 36 patch with borders on and have best pressed or starched it, it's time to start cutting. As I mentioned before, It's a good idea to be able to cut all 49 pieces at the same time. It makes keeping track of your piece placement easier.

The Twister ruler is a square ruler with lines drawn a little wonky. These are the lines you will be lining up on the seams.

Starting at the top left corner, place the ruler along all 3 seam lines. You will only have 3 here because the border is sewn on without any seams. Make sure there are no bumps under the ruler. It's easy to get bumps since the ruler is on 'stilts'. Then cut around all 4 sides of the ruler. Be sure to no go more than a 1/4" past the sides or it will cut into the next piece.


Remove the square from the cutting table and put onto a design wall or table.This is what the 36 patch will look like now.


Here's the fun part. Twist the block clockwise until the block is a straight square.


Repeat for each square, remembering to line up the lines with the seams. On any piece that has a border included there will only be 3 seams to line up with and on all the rest there will be 4. This is what it will look like after 2 squares are cut. 


Keep cutting and adding squares to finish the first row. Notice how you can see the twisted pinwheels forming.


Then start on the 2nd row. This is what it will look like after the first two squares of the second row are cut. You can see the first twisted pinwheel now.


After you have all 49 squares cut out then sew them back together just like you did for the original 36 patch, but you will have 7 rows of 7 this time. Remember not to pull the fabric when sewing it back together because it is cut on the bias and has extra stretch.


Now I just need to give this a quick press. Next week we will be adding an outside border or 2 if you want. I have some of the black Sassy with the little paisley print for the border, but an thinking of doing a turquoise for a first border.

Don't forget to link up your twister quilts on the flickr page.


Twist Along Week 3

Now that you have your 36 patch with borders on and have best pressed or starched it, it's time to start cutting. As I mentioned before, It's a good idea to be able to cut all 49 pieces at the same time. It makes keeping track of your piece placement easier.

The Twister ruler is a square ruler with lines drawn a little wonky. These are the lines you will be lining up on the seams.

Starting at the top left corner, place the ruler along all 3 seam lines. You will only have 3 here because the border is sewn on without any seams. Make sure there are no bumps under the ruler. It's easy to get bumps since the ruler is on 'stilts'. Then cut around all 4 sides of the ruler. Be sure to no go more than a 1/4" past the sides or it will cut into the next piece.


Remove the square from the cutting table and put onto a design wall or table.This is what the 36 patch will look like now.


Here's the fun part. Twist the block clockwise until the block is a straight square.


Repeat for each square, remembering to line up the lines with the seams. On any piece that has a border included there will only be 3 seams to line up with and on all the rest there will be 4. This is what it will look like after 2 squares are cut. 


Keep cutting and adding squares to finish the first row. Notice how you can see the twisted pinwheels forming.


Then start on the 2nd row. This is what it will look like after the first two squares of the second row are cut. You can see the first twisted pinwheel now.


After you have all 49 squares cut out then sew them back together just like you did for the original 36 patch, but you will have 7 rows of 7 this time. Remember not to pull the fabric when sewing it back together because it is cut on the bias and has extra stretch.


Now I just need to give this a quick press. Next week we will be adding an outside border or 2 if you want. I have some of the black Sassy with the little paisley print for the border, but an thinking of doing a turquoise for a first border.

Don't forget to link up your twister quilts on the flickr page.


Sunday, February 19, 2012

Twist Along Week 2

Are you ready to work on your Twister Quilt some more? If you missed week 1 here's the link to that post.

This week we will be putting the borders on the 36 patch you made last week. Then later in the week we will be cutting the twister squares.


If you are using 10" squares for the 36 patch you will need to cut 8 - 6.5" x WOF strips then sew 2 strips together to make 4 long border strips.
If you are using 5" squares you will need 4 - 3.5" x WOF strips

Here's a short tutorial on how to sew strips together with a bias seam.

Here's a technique I use when putting borders on my quilts. I used to sew a strip of fabric onto the quilt that was bigger than the quilt length and trim the overhang off to be even with the quilt. But that just got me a wonky quilt. The secret is to cut the opposite side borders the same length and then make the quilt fit the borders so both sides are even.


1. Lay your quilt top out on the floor and take 2 of the border pieces. Pin them to the middle of the top part. Have a helper hold where the fabric is pinned together or put a pin cushion or something else that has a little weight to it on the spot where the pins are. The middle of the quilt is the most stable and least wonky part.

2. Now smooth out the 2 border pieces over the quilt, trying not to pull the border strips or the quilt.


3. Trim the ends of the border strips off where the bottom edge of the quilt is (I use scissors). These 2 borders are for the sides of the quilt. If you cut the pieces a tad bit wonky you can straighten them up.

4. Fold the quilt top in half along the side. If the half way mark is not on a seam then finger press a crease or use a pin to mark the center.

5. Fold the border piece in half and fold to make a crease or use a pin to mark it.

6. Line up both the half way marks and pin.

7. Now pin the border to the right end of the quilt. I find it helpful to pin along the top and then one pin along the side edge to prevent any part from stretching. If it is a tad bit to small or big you can spread out the problem throughout the entire side so it won't even be noticeable. This is how you fix a too big or too small side. Now pin half way between the 2 pins and so on till the entire right half of the border is pinned. I usually like to have a pin at least every 3 inches.

8. Repeat with the left half until the entire border is pinned.

9. Repeat for the opposite side so you have both borders pinned on.

10. Sew using a 1/4" seam. Then press towards the border.

11. Repeat for the top and bottom parts.

Walaa! Borders on the quilt that have right angles for the corners!


I'd love to see your progress, don't forget to post them on the flickr page for the Twist Along.

This should keep you busy for a while. Later in the week we will start cutting the twister squares and sewing them together. That part will take the longest so I have allowed a few extra days for it.

Till next time


Twist Along Week 2

Are you ready to work on your Twister Quilt some more? If you missed week 1 here's the link to that post.

This week we will be putting the borders on the 36 patch you made last week. Then later in the week we will be cutting the twister squares.


If you are using 10" squares for the 36 patch you will need to cut 8 - 6.5" x WOF strips then sew 2 strips together to make 4 long border strips.
If you are using 5" squares you will need 4 - 3.5" x WOF strips

Here's a short tutorial on how to sew strips together with a bias seam.

Here's a technique I use when putting borders on my quilts. I used to sew a strip of fabric onto the quilt that was bigger than the quilt length and trim the overhang off to be even with the quilt. But that just got me a wonky quilt. The secret is to cut the opposite side borders the same length and then make the quilt fit the borders so both sides are even.


1. Lay your quilt top out on the floor and take 2 of the border pieces. Pin them to the middle of the top part. Have a helper hold where the fabric is pinned together or put a pin cushion or something else that has a little weight to it on the spot where the pins are. The middle of the quilt is the most stable and least wonky part.

2. Now smooth out the 2 border pieces over the quilt, trying not to pull the border strips or the quilt.


3. Trim the ends of the border strips off where the bottom edge of the quilt is (I use scissors). These 2 borders are for the sides of the quilt. If you cut the pieces a tad bit wonky you can straighten them up.

4. Fold the quilt top in half along the side. If the half way mark is not on a seam then finger press a crease or use a pin to mark the center.

5. Fold the border piece in half and fold to make a crease or use a pin to mark it.

6. Line up both the half way marks and pin.

7. Now pin the border to the right end of the quilt. I find it helpful to pin along the top and then one pin along the side edge to prevent any part from stretching. If it is a tad bit to small or big you can spread out the problem throughout the entire side so it won't even be noticeable. This is how you fix a too big or too small side. Now pin half way between the 2 pins and so on till the entire right half of the border is pinned. I usually like to have a pin at least every 3 inches.

8. Repeat with the left half until the entire border is pinned.

9. Repeat for the opposite side so you have both borders pinned on.

10. Sew using a 1/4" seam. Then press towards the border.

11. Repeat for the top and bottom parts.

Walaa! Borders on the quilt that have right angles for the corners!


I'd love to see your progress, don't forget to post them on the flickr page for the Twist Along.

This should keep you busy for a while. Later in the week we will start cutting the twister squares and sewing them together. That part will take the longest so I have allowed a few extra days for it.

Till next time


Sunday, February 12, 2012

Twist for the week

Welcome to the first week of Twist Along with Sha Quilt Along!


First some info...
1. There is a flickr page set up for this QAL http://www.flickr.com/groups/1879756@N24/

2. There's a Twist Along tab at the top bar of the blog, this is where all the links for the QAL can be found if you get lost along the way.

Now onto the fun!

This week is simple, but the most important one in a way.

You will need 36 - 10"x10" or 5"x5" squares to start with. You can use either a layer cake, charm pack or cut your own squares.

Once you have them all gathered together it's time to decide on the layout. You will be making a 6x6 grid (6 across and 6 down) so start playing around with a layout. The important thing to remember is that you want lots of contrast. Try to spread the lights and darks around so they don't touch each other, as well as squares that are the same color. The more contrast the better the pinwheels will be seen.

Once you get a pleasing layout, take a picture and look at it on your computer to get a better look at it. This way you can try different layouts if you want. 

Now it's time to sew the rows together into a 36 patch. Here's a tutorial on making a 36 patch for those who need it.

That's all for this week. Here's what my 36 patch looks like.

  
I'd love to see your progress, why not post it to the flickr page?

Till next time,

Twist for the week

Welcome to the first week of Twist Along with Sha Quilt Along!


First some info...
1. There is a flickr page set up for this QAL http://www.flickr.com/groups/1879756@N24/

2. There's a Twist Along tab at the top bar of the blog, this is where all the links for the QAL can be found if you get lost along the way.

Now onto the fun!

This week is simple, but the most important one in a way.

You will need 36 - 10"x10" or 5"x5" squares to start with. You can use either a layer cake, charm pack or cut your own squares.

Once you have them all gathered together it's time to decide on the layout. You will be making a 6x6 grid (6 across and 6 down) so start playing around with a layout. The important thing to remember is that you want lots of contrast. Try to spread the lights and darks around so they don't touch each other, as well as squares that are the same color. The more contrast the better the pinwheels will be seen.

Once you get a pleasing layout, take a picture and look at it on your computer to get a better look at it. This way you can try different layouts if you want. 

Now it's time to sew the rows together into a 36 patch. Here's a tutorial on making a 36 patch for those who need it.

That's all for this week. Here's what my 36 patch looks like.

  
I'd love to see your progress, why not post it to the flickr page?

Till next time,

Thursday, February 2, 2012

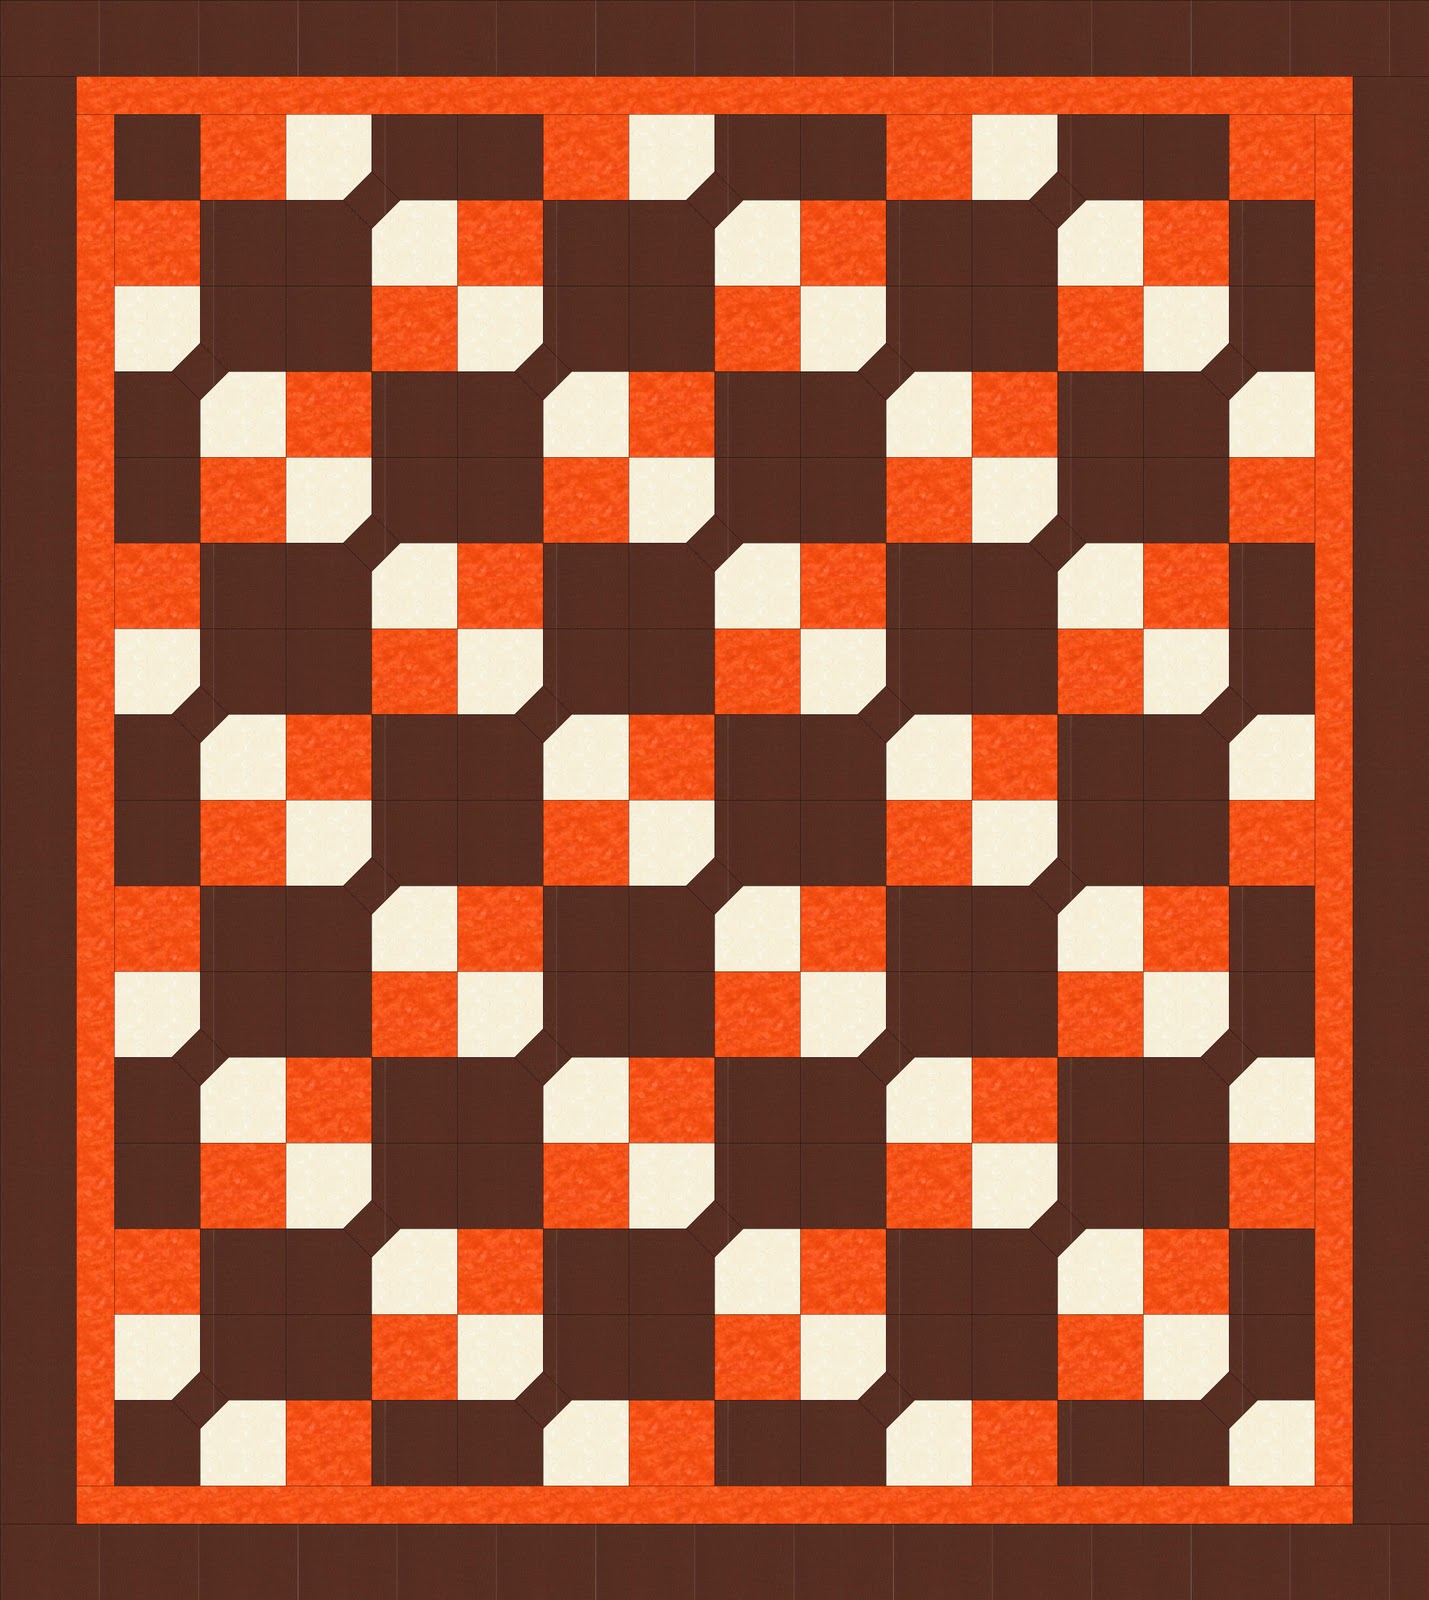
Floating Squares Quilt Pattern

Introducing my newest pattern...Floating Squares


71" x 80 

You will need:

4 yards brown fabric
1 ¾ yards orange fabric
1 ¼ yards cream fabric
4 yards backing fabric


Cutting Directions:

All strips are cut WOF (Width of fabric)
14 - 5" strips brown, sub cut 7 strips into 56 - 5" squares
4 - 2 ½" strips brown, sub cut into 56 - 2.5" squares

8 - 3 ½" strips brown for the border
7 - 5" strips cream, sub cut into 56 - 5" squares
7 - 5" strips orange

8 - 1 ½" strips orange for the border
9 - 2 ¼ strips brown for the binding 


Making the 4 patch blocks:
With 7 brown strips and 7 orange strips sew a 5" strip of brown to a 5" strip of orange along the long side.
Press towards the brown.
Sub cut the strips into 5" pieces making each piece 5" x 9 ½".
Repeat with the other 6 strips to make 56 pieces.


Sew the 56 pieces together to make 28 brown and orange 4 patches


Making the Bowtie blocks:

First you need to get your machine ready. Do you have a marked line or a piece of tape along your 1/4" line? Just about everyone I know around here does. What you do is put your needle in the down position and raise your presser foot. Insert a ruler against the needle and lower your presser foot. Line up a line on your ruler perpendicular to a line on your machine table so you know your ruler is straight, ie. the 4" line on the ruler. Then with a fine point sharpie draw a line against the ruler or place a 1/4" piece of tape in the same spot. I didn't have any 1/4" tape when I did this so I used a piece of painters tape that I cut with my rotary cutter to 1/4". And don't worry about the sharpie, you can always remove it with denatured alcohol.


With the 56 cream 5" squares and the 56 brown 2 ½" squares:
Place the brown 2 ½" squares on the top right corner of a cream 5" square. Make sure they edges are even.


Start sewing at the place where the top left corner of the brown square begins. Keep the bottom right part of the brown square even with the tape line on your machine and continue sewing till you reach the bottom right point of the brown square.


Make 56 of these
Trim the brown triangle piece that is closest to the cream point off. In other words the part you will not see. This will keep the integrity of the square in case your points are a little wonky

  
Press the points over and you will have 56 connector squares


Sew a connector square to a brown 5" square. Be sure they are sewn together like the picture below. Make 56 sets.


Sew 2 sets into a 4 patch to make the bowtie blocks. Make 28 blocks.


Putting it all together:

Using the diagram below sew 4 rows like this, pressing towards the left


and 4 rows like this, pressing towards the right.


Then sew the rows together

 
Adding the borders:

Sew 2 orange 1 ½" strips together along the short side. Make 4 sets of these. Sew the 2 side borders on and then the top and borders on.

Sew 2 brown 3 ½" strips together along the short side. Make 4 sets. Sew the 2 side borders on and then the top and bottom borders on.

Baste. Quilt and Bind as you would like.


I hope you enjoy this pattern!

Floating Squares Quilt Pattern

Introducing my newest pattern...Floating Squares


71" x 80 

You will need:

4 yards brown fabric
1 ¾ yards orange fabric
1 ¼ yards cream fabric
4 yards backing fabric


Cutting Directions:

All strips are cut WOF (Width of fabric)
14 - 5" strips brown, sub cut 7 strips into 56 - 5" squares
4 - 2 ½" strips brown, sub cut into 56 - 2.5" squares

8 - 3 ½" strips brown for the border
7 - 5" strips cream, sub cut into 56 - 5" squares
7 - 5" strips orange

8 - 1 ½" strips orange for the border
9 - 2 ¼ strips brown for the binding 


Making the 4 patch blocks:
With 7 brown strips and 7 orange strips sew a 5" strip of brown to a 5" strip of orange along the long side.
Press towards the brown.
Sub cut the strips into 5" pieces making each piece 5" x 9 ½".
Repeat with the other 6 strips to make 56 pieces.


Sew the 56 pieces together to make 28 brown and orange 4 patches


Making the Bowtie blocks:

First you need to get your machine ready. Do you have a marked line or a piece of tape along your 1/4" line? Just about everyone I know around here does. What you do is put your needle in the down position and raise your presser foot. Insert a ruler against the needle and lower your presser foot. Line up a line on your ruler perpendicular to a line on your machine table so you know your ruler is straight, ie. the 4" line on the ruler. Then with a fine point sharpie draw a line against the ruler or place a 1/4" piece of tape in the same spot. I didn't have any 1/4" tape when I did this so I used a piece of painters tape that I cut with my rotary cutter to 1/4". And don't worry about the sharpie, you can always remove it with denatured alcohol.


With the 56 cream 5" squares and the 56 brown 2 ½" squares:
Place the brown 2 ½" squares on the top right corner of a cream 5" square. Make sure they edges are even.


Start sewing at the place where the top left corner of the brown square begins. Keep the bottom right part of the brown square even with the tape line on your machine and continue sewing till you reach the bottom right point of the brown square.


Make 56 of these
Trim the brown triangle piece that is closest to the cream point off. In other words the part you will not see. This will keep the integrity of the square in case your points are a little wonky

  
Press the points over and you will have 56 connector squares


Sew a connector square to a brown 5" square. Be sure they are sewn together like the picture below. Make 56 sets.


Sew 2 sets into a 4 patch to make the bowtie blocks. Make 28 blocks.


Putting it all together:

Using the diagram below sew 4 rows like this, pressing towards the left


and 4 rows like this, pressing towards the right.


Then sew the rows together

 
Adding the borders:

Sew 2 orange 1 ½" strips together along the short side. Make 4 sets of these. Sew the 2 side borders on and then the top and borders on.

Sew 2 brown 3 ½" strips together along the short side. Make 4 sets. Sew the 2 side borders on and then the top and bottom borders on.

Baste. Quilt and Bind as you would like.


I hope you enjoy this pattern!