Showing posts with label Pattern. Show all posts

Thursday, February 2, 2012

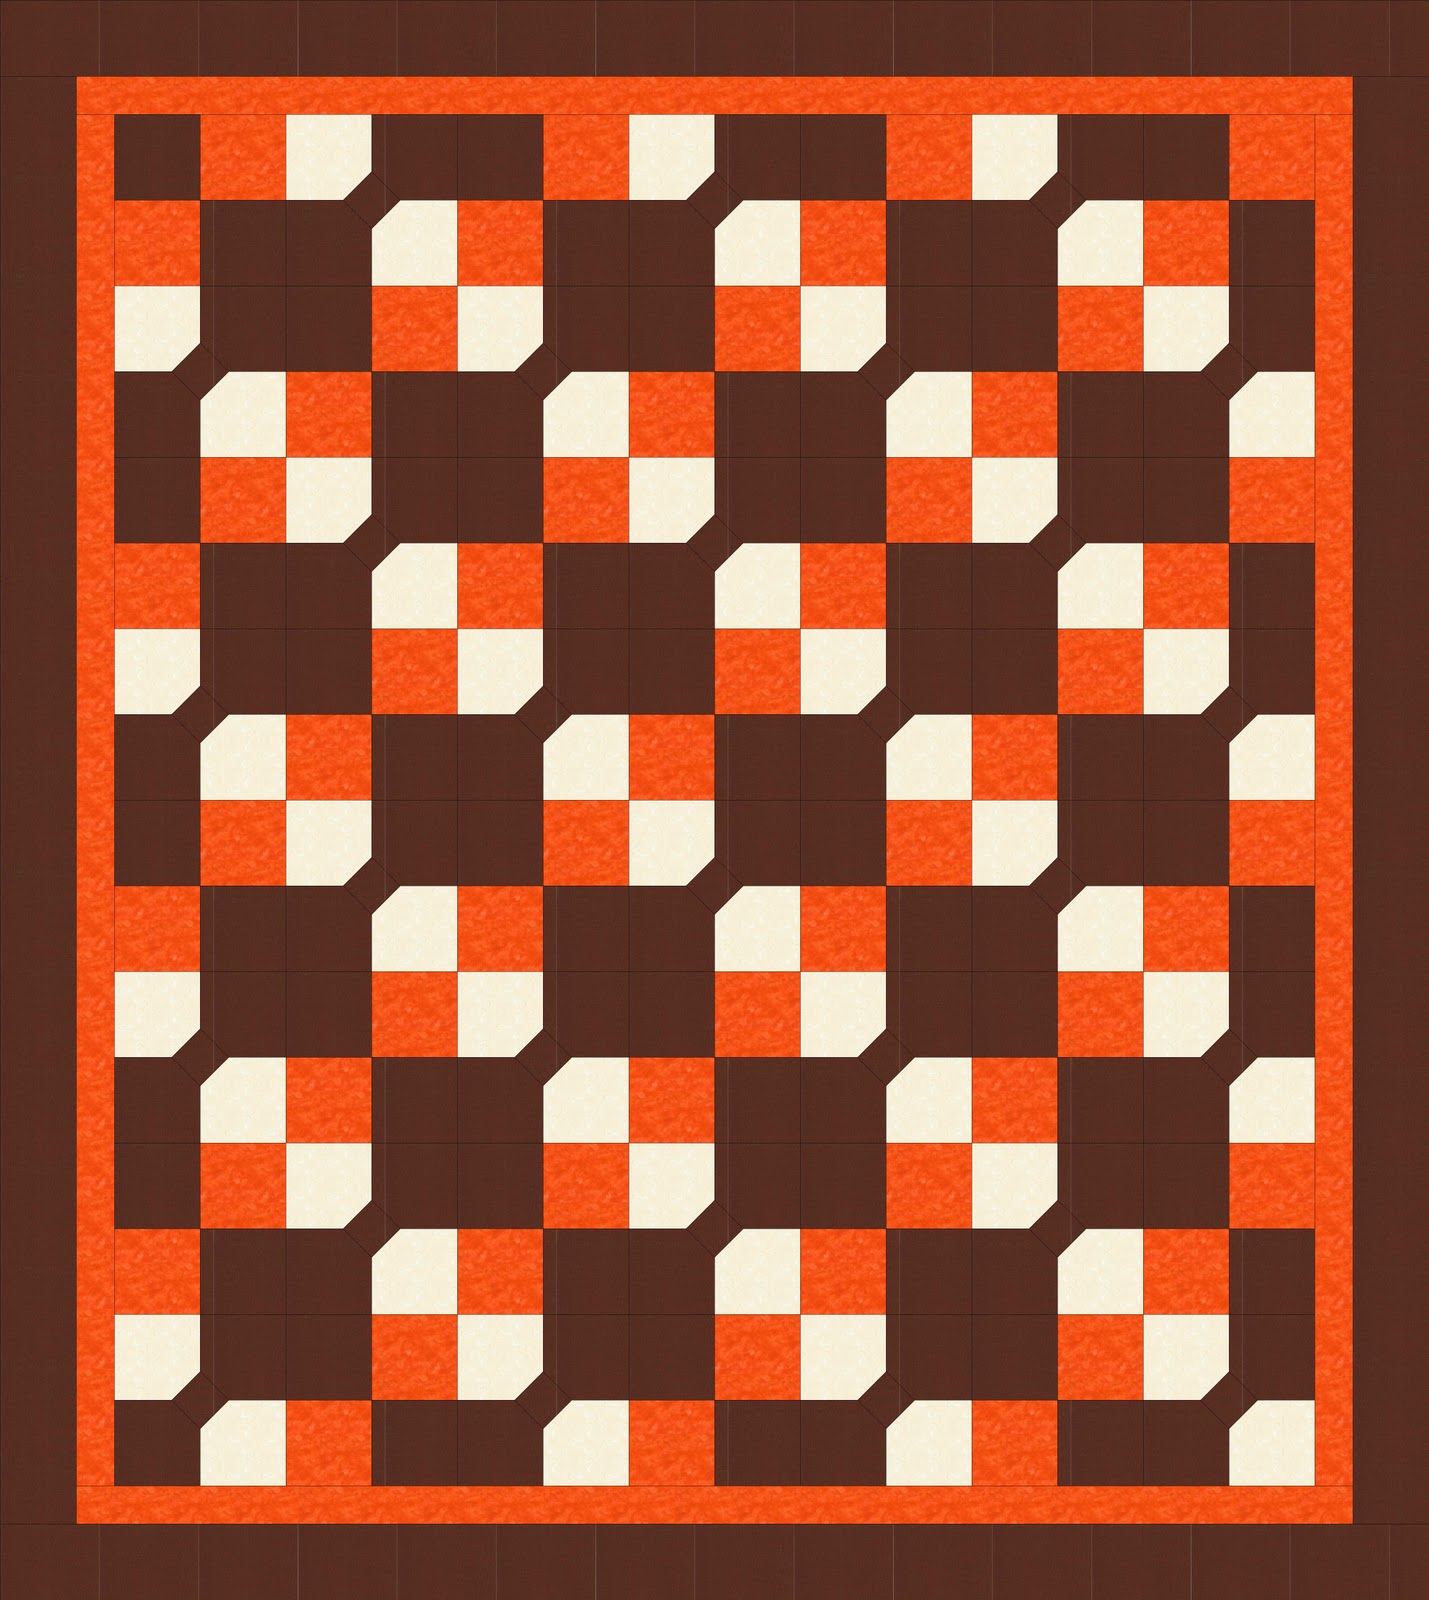
Floating Squares Quilt Pattern

Introducing my newest pattern...Floating Squares


71" x 80 

You will need:

4 yards brown fabric
1 ¾ yards orange fabric
1 ¼ yards cream fabric
4 yards backing fabric


Cutting Directions:

All strips are cut WOF (Width of fabric)
14 - 5" strips brown, sub cut 7 strips into 56 - 5" squares
4 - 2 ½" strips brown, sub cut into 56 - 2.5" squares

8 - 3 ½" strips brown for the border
7 - 5" strips cream, sub cut into 56 - 5" squares
7 - 5" strips orange

8 - 1 ½" strips orange for the border
9 - 2 ¼ strips brown for the binding 


Making the 4 patch blocks:
With 7 brown strips and 7 orange strips sew a 5" strip of brown to a 5" strip of orange along the long side.
Press towards the brown.
Sub cut the strips into 5" pieces making each piece 5" x 9 ½".
Repeat with the other 6 strips to make 56 pieces.


Sew the 56 pieces together to make 28 brown and orange 4 patches


Making the Bowtie blocks:

First you need to get your machine ready. Do you have a marked line or a piece of tape along your 1/4" line? Just about everyone I know around here does. What you do is put your needle in the down position and raise your presser foot. Insert a ruler against the needle and lower your presser foot. Line up a line on your ruler perpendicular to a line on your machine table so you know your ruler is straight, ie. the 4" line on the ruler. Then with a fine point sharpie draw a line against the ruler or place a 1/4" piece of tape in the same spot. I didn't have any 1/4" tape when I did this so I used a piece of painters tape that I cut with my rotary cutter to 1/4". And don't worry about the sharpie, you can always remove it with denatured alcohol.


With the 56 cream 5" squares and the 56 brown 2 ½" squares:
Place the brown 2 ½" squares on the top right corner of a cream 5" square. Make sure they edges are even.


Start sewing at the place where the top left corner of the brown square begins. Keep the bottom right part of the brown square even with the tape line on your machine and continue sewing till you reach the bottom right point of the brown square.


Make 56 of these
Trim the brown triangle piece that is closest to the cream point off. In other words the part you will not see. This will keep the integrity of the square in case your points are a little wonky

  
Press the points over and you will have 56 connector squares


Sew a connector square to a brown 5" square. Be sure they are sewn together like the picture below. Make 56 sets.


Sew 2 sets into a 4 patch to make the bowtie blocks. Make 28 blocks.


Putting it all together:

Using the diagram below sew 4 rows like this, pressing towards the left


and 4 rows like this, pressing towards the right.


Then sew the rows together

 
Adding the borders:

Sew 2 orange 1 ½" strips together along the short side. Make 4 sets of these. Sew the 2 side borders on and then the top and borders on.

Sew 2 brown 3 ½" strips together along the short side. Make 4 sets. Sew the 2 side borders on and then the top and bottom borders on.

Baste. Quilt and Bind as you would like.


I hope you enjoy this pattern!

Floating Squares Quilt Pattern

Introducing my newest pattern...Floating Squares


71" x 80 

You will need:

4 yards brown fabric
1 ¾ yards orange fabric
1 ¼ yards cream fabric
4 yards backing fabric


Cutting Directions:

All strips are cut WOF (Width of fabric)
14 - 5" strips brown, sub cut 7 strips into 56 - 5" squares
4 - 2 ½" strips brown, sub cut into 56 - 2.5" squares

8 - 3 ½" strips brown for the border
7 - 5" strips cream, sub cut into 56 - 5" squares
7 - 5" strips orange

8 - 1 ½" strips orange for the border
9 - 2 ¼ strips brown for the binding 


Making the 4 patch blocks:
With 7 brown strips and 7 orange strips sew a 5" strip of brown to a 5" strip of orange along the long side.
Press towards the brown.
Sub cut the strips into 5" pieces making each piece 5" x 9 ½".
Repeat with the other 6 strips to make 56 pieces.


Sew the 56 pieces together to make 28 brown and orange 4 patches


Making the Bowtie blocks:

First you need to get your machine ready. Do you have a marked line or a piece of tape along your 1/4" line? Just about everyone I know around here does. What you do is put your needle in the down position and raise your presser foot. Insert a ruler against the needle and lower your presser foot. Line up a line on your ruler perpendicular to a line on your machine table so you know your ruler is straight, ie. the 4" line on the ruler. Then with a fine point sharpie draw a line against the ruler or place a 1/4" piece of tape in the same spot. I didn't have any 1/4" tape when I did this so I used a piece of painters tape that I cut with my rotary cutter to 1/4". And don't worry about the sharpie, you can always remove it with denatured alcohol.


With the 56 cream 5" squares and the 56 brown 2 ½" squares:
Place the brown 2 ½" squares on the top right corner of a cream 5" square. Make sure they edges are even.


Start sewing at the place where the top left corner of the brown square begins. Keep the bottom right part of the brown square even with the tape line on your machine and continue sewing till you reach the bottom right point of the brown square.


Make 56 of these
Trim the brown triangle piece that is closest to the cream point off. In other words the part you will not see. This will keep the integrity of the square in case your points are a little wonky

  
Press the points over and you will have 56 connector squares


Sew a connector square to a brown 5" square. Be sure they are sewn together like the picture below. Make 56 sets.


Sew 2 sets into a 4 patch to make the bowtie blocks. Make 28 blocks.


Putting it all together:

Using the diagram below sew 4 rows like this, pressing towards the left


and 4 rows like this, pressing towards the right.


Then sew the rows together

 
Adding the borders:

Sew 2 orange 1 ½" strips together along the short side. Make 4 sets of these. Sew the 2 side borders on and then the top and borders on.

Sew 2 brown 3 ½" strips together along the short side. Make 4 sets. Sew the 2 side borders on and then the top and bottom borders on.

Baste. Quilt and Bind as you would like.


I hope you enjoy this pattern!

Thursday, January 19, 2012

Little Red House

If you are looking for the Nifty Notions Ruler giveaway click here.

I don't know about you but as soon as I made my first Dresden fan point I knew I had to make a Dresden house.


I have been thinking about it all week and today I had some time to make one.


I used 2 - 10" squares or layer cake pieces.

1. Cut 1 - 10" wedge out of the house fabric.


2. Fold the wedge in half along the length and sew a 1/4" seam along the bottom seam.


3. Flip the part you just sewed right side out to make a point. Use something pointy to make sure the point is crisp and press. Use Best Press or Starch .


4. Trim the house to be 6". Measure from the top point 6" and trim the rest off. I used the Nifty Notions 4" x 14" ruler which was perfect for this project.


5. Turn a 1/4" under towards the back to make a smooth edge on both sides and the bottom. Press. I used some Best Press to make the folds crisp.


6. Trace the shape of the house into some double sided fusible web and then cut the shape out 1/4" in from the line. This will make the web a little smaller than the fabric so it doesn't show. (I used Steam-A-Seam). Follow the manufacturers directions to affix the web to the house and then the house to the background.


7. Now either machine or hand applique the house onto the background. There you go...a little red house!


I am going to add some grass, trees and some flowers to finish this off. I used the blanket stitch on my machine to sew on the house and had fun with some other decorative stitches that my machine has.

Remember to enter the giveaway for 2 Nifty Notions rulers! Click here to find out how. 


Little Red House

If you are looking for the Nifty Notions Ruler giveaway click here.

I don't know about you but as soon as I made my first Dresden fan point I knew I had to make a Dresden house.


I have been thinking about it all week and today I had some time to make one.


I used 2 - 10" squares or layer cake pieces.

1. Cut 1 - 10" wedge out of the house fabric.


2. Fold the wedge in half along the length and sew a 1/4" seam along the bottom seam.


3. Flip the part you just sewed right side out to make a point. Use something pointy to make sure the point is crisp and press. Use Best Press or Starch .


4. Trim the house to be 6". Measure from the top point 6" and trim the rest off. I used the Nifty Notions 4" x 14" ruler which was perfect for this project.


5. Turn a 1/4" under towards the back to make a smooth edge on both sides and the bottom. Press. I used some Best Press to make the folds crisp.


6. Trace the shape of the house into some double sided fusible web and then cut the shape out 1/4" in from the line. This will make the web a little smaller than the fabric so it doesn't show. (I used Steam-A-Seam). Follow the manufacturers directions to affix the web to the house and then the house to the background.


7. Now either machine or hand applique the house onto the background. There you go...a little red house!


I am going to add some grass, trees and some flowers to finish this off. I used the blanket stitch on my machine to sew on the house and had fun with some other decorative stitches that my machine has.

Remember to enter the giveaway for 2 Nifty Notions rulers! Click here to find out how.