Showing posts with label PDF Pattern. Show all posts

Thursday, February 2, 2012

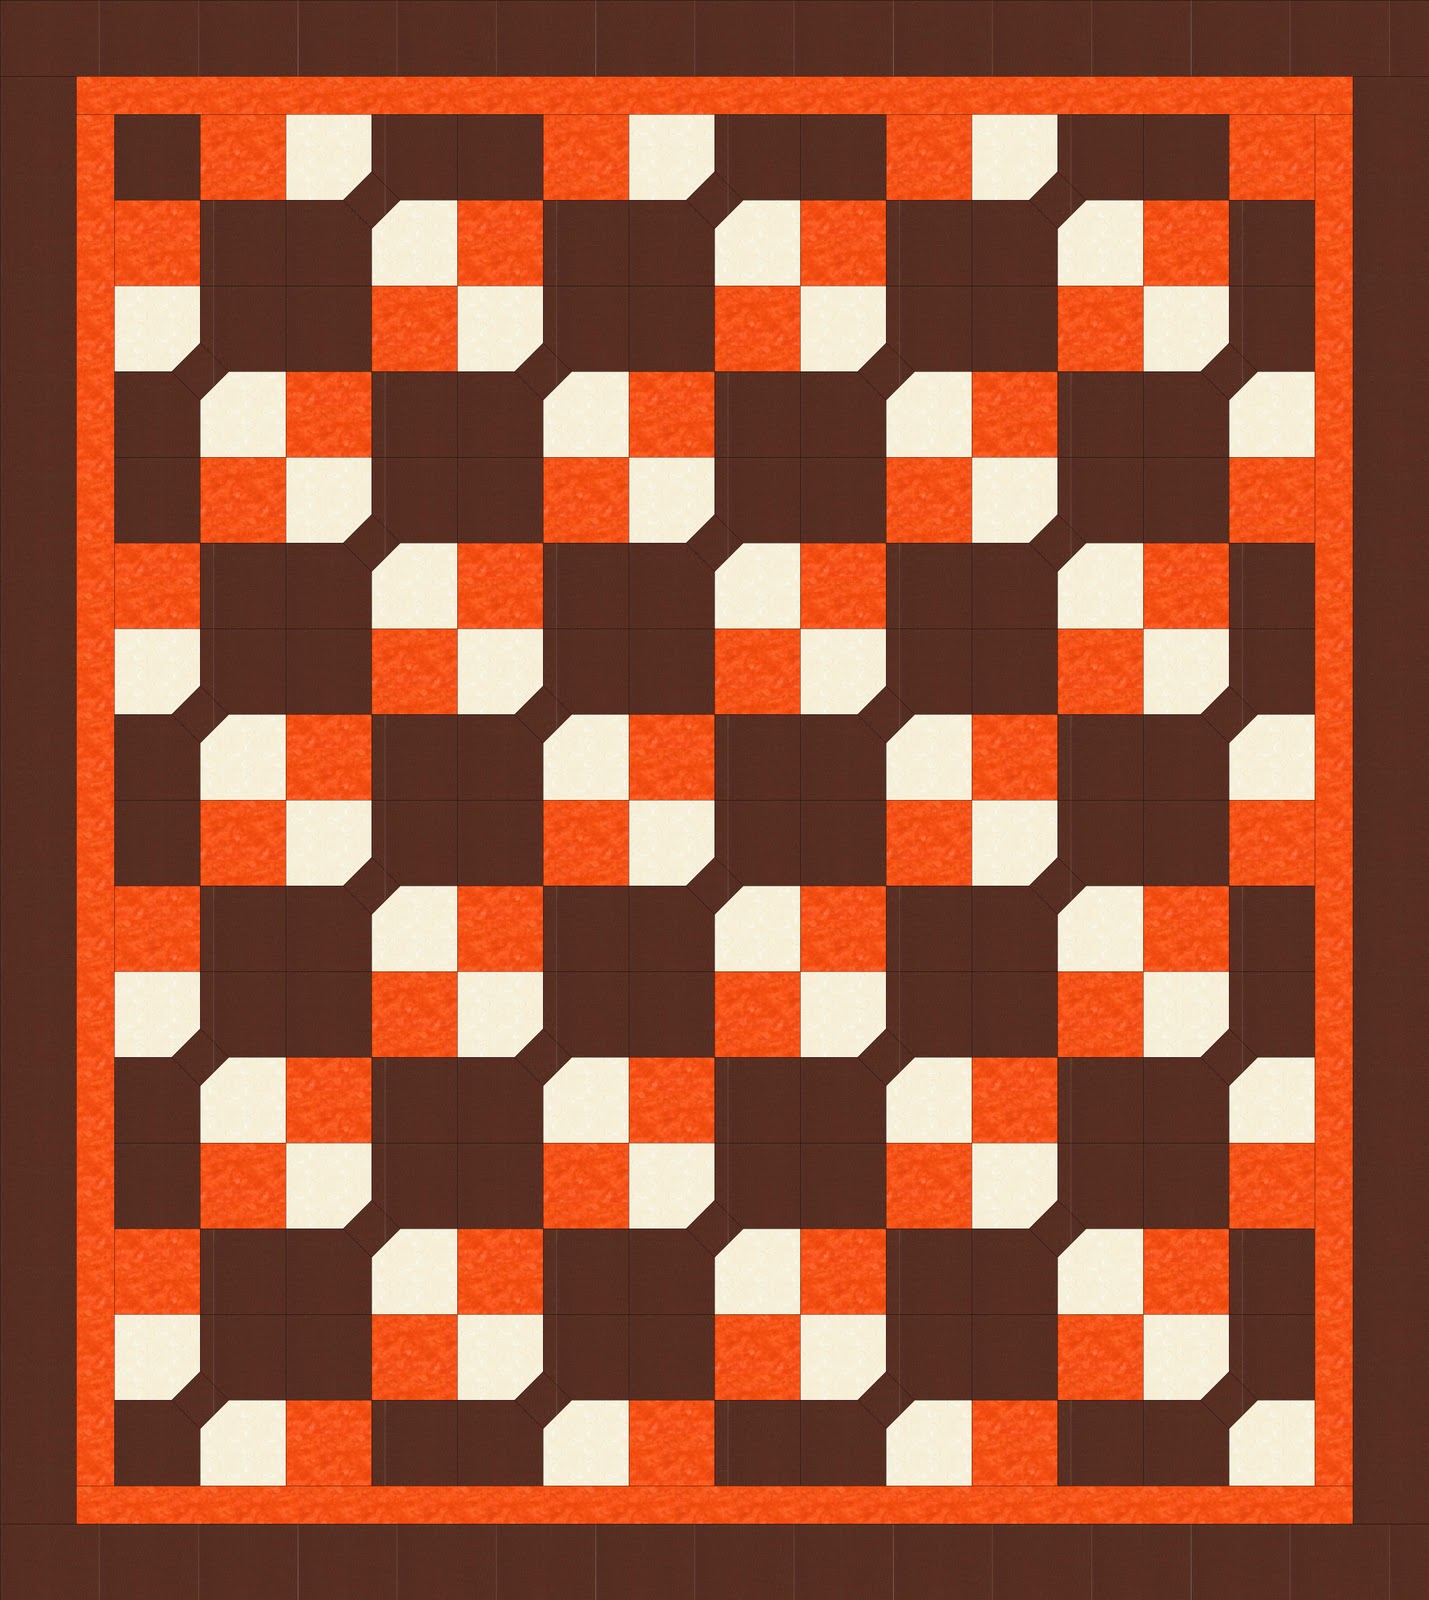
Floating Squares Quilt Pattern

Introducing my newest pattern...Floating Squares


71" x 80 

You will need:

4 yards brown fabric
1 ¾ yards orange fabric
1 ¼ yards cream fabric
4 yards backing fabric


Cutting Directions:

All strips are cut WOF (Width of fabric)
14 - 5" strips brown, sub cut 7 strips into 56 - 5" squares
4 - 2 ½" strips brown, sub cut into 56 - 2.5" squares

8 - 3 ½" strips brown for the border
7 - 5" strips cream, sub cut into 56 - 5" squares
7 - 5" strips orange

8 - 1 ½" strips orange for the border
9 - 2 ¼ strips brown for the binding 


Making the 4 patch blocks:
With 7 brown strips and 7 orange strips sew a 5" strip of brown to a 5" strip of orange along the long side.
Press towards the brown.
Sub cut the strips into 5" pieces making each piece 5" x 9 ½".
Repeat with the other 6 strips to make 56 pieces.


Sew the 56 pieces together to make 28 brown and orange 4 patches


Making the Bowtie blocks:

First you need to get your machine ready. Do you have a marked line or a piece of tape along your 1/4" line? Just about everyone I know around here does. What you do is put your needle in the down position and raise your presser foot. Insert a ruler against the needle and lower your presser foot. Line up a line on your ruler perpendicular to a line on your machine table so you know your ruler is straight, ie. the 4" line on the ruler. Then with a fine point sharpie draw a line against the ruler or place a 1/4" piece of tape in the same spot. I didn't have any 1/4" tape when I did this so I used a piece of painters tape that I cut with my rotary cutter to 1/4". And don't worry about the sharpie, you can always remove it with denatured alcohol.


With the 56 cream 5" squares and the 56 brown 2 ½" squares:
Place the brown 2 ½" squares on the top right corner of a cream 5" square. Make sure they edges are even.


Start sewing at the place where the top left corner of the brown square begins. Keep the bottom right part of the brown square even with the tape line on your machine and continue sewing till you reach the bottom right point of the brown square.


Make 56 of these
Trim the brown triangle piece that is closest to the cream point off. In other words the part you will not see. This will keep the integrity of the square in case your points are a little wonky

  
Press the points over and you will have 56 connector squares


Sew a connector square to a brown 5" square. Be sure they are sewn together like the picture below. Make 56 sets.


Sew 2 sets into a 4 patch to make the bowtie blocks. Make 28 blocks.


Putting it all together:

Using the diagram below sew 4 rows like this, pressing towards the left


and 4 rows like this, pressing towards the right.


Then sew the rows together

 
Adding the borders:

Sew 2 orange 1 ½" strips together along the short side. Make 4 sets of these. Sew the 2 side borders on and then the top and borders on.

Sew 2 brown 3 ½" strips together along the short side. Make 4 sets. Sew the 2 side borders on and then the top and bottom borders on.

Baste. Quilt and Bind as you would like.


I hope you enjoy this pattern!

Floating Squares Quilt Pattern

Introducing my newest pattern...Floating Squares


71" x 80 

You will need:

4 yards brown fabric
1 ¾ yards orange fabric
1 ¼ yards cream fabric
4 yards backing fabric


Cutting Directions:

All strips are cut WOF (Width of fabric)
14 - 5" strips brown, sub cut 7 strips into 56 - 5" squares
4 - 2 ½" strips brown, sub cut into 56 - 2.5" squares

8 - 3 ½" strips brown for the border
7 - 5" strips cream, sub cut into 56 - 5" squares
7 - 5" strips orange

8 - 1 ½" strips orange for the border
9 - 2 ¼ strips brown for the binding 


Making the 4 patch blocks:
With 7 brown strips and 7 orange strips sew a 5" strip of brown to a 5" strip of orange along the long side.
Press towards the brown.
Sub cut the strips into 5" pieces making each piece 5" x 9 ½".
Repeat with the other 6 strips to make 56 pieces.


Sew the 56 pieces together to make 28 brown and orange 4 patches


Making the Bowtie blocks:

First you need to get your machine ready. Do you have a marked line or a piece of tape along your 1/4" line? Just about everyone I know around here does. What you do is put your needle in the down position and raise your presser foot. Insert a ruler against the needle and lower your presser foot. Line up a line on your ruler perpendicular to a line on your machine table so you know your ruler is straight, ie. the 4" line on the ruler. Then with a fine point sharpie draw a line against the ruler or place a 1/4" piece of tape in the same spot. I didn't have any 1/4" tape when I did this so I used a piece of painters tape that I cut with my rotary cutter to 1/4". And don't worry about the sharpie, you can always remove it with denatured alcohol.


With the 56 cream 5" squares and the 56 brown 2 ½" squares:
Place the brown 2 ½" squares on the top right corner of a cream 5" square. Make sure they edges are even.


Start sewing at the place where the top left corner of the brown square begins. Keep the bottom right part of the brown square even with the tape line on your machine and continue sewing till you reach the bottom right point of the brown square.


Make 56 of these
Trim the brown triangle piece that is closest to the cream point off. In other words the part you will not see. This will keep the integrity of the square in case your points are a little wonky

  
Press the points over and you will have 56 connector squares


Sew a connector square to a brown 5" square. Be sure they are sewn together like the picture below. Make 56 sets.


Sew 2 sets into a 4 patch to make the bowtie blocks. Make 28 blocks.


Putting it all together:

Using the diagram below sew 4 rows like this, pressing towards the left


and 4 rows like this, pressing towards the right.


Then sew the rows together

 
Adding the borders:

Sew 2 orange 1 ½" strips together along the short side. Make 4 sets of these. Sew the 2 side borders on and then the top and borders on.

Sew 2 brown 3 ½" strips together along the short side. Make 4 sets. Sew the 2 side borders on and then the top and bottom borders on.

Baste. Quilt and Bind as you would like.


I hope you enjoy this pattern!

Thursday, January 26, 2012

I'm a Snake Charmer Now

If you are looking for the Darling Heart FQ bundle giveaway click here.

I admit it...I am a new snake charmer :)

No I don't mean real snakes (just the fact that I can type that word is a big step for me) but I did charm some charm squares into a cute quilt top.


I used the Snake Charmer pattern by Little Louise Designs. The great thing about this pattern is that its available as a PDF from The Fat Quarter Shop! This is my favorite way to purchase patterns. I can save them to IBooks on my Ipad and have it ready whenever I need it.

Instead of a charm pack, I used 7 FQ's from my Darling Heart Garden FQ bundle and made it a little wider and longer. The pattern is so easy that adding to the quilt is easy. There's no real quilt math to do.

And it uses one of my favorite techniques, connectors. If you missed my connector tutorial you can find it here.

You might have noticed that it's not all the way done yet, there's 2 reasons for that (aka my excuses):
1. I have been slaving away trying to finish my son Tyler's quilt before he goes back to school. I'm very sad to say that I did not accomplish that goal, but I'm very close. All I have left to do is the binding. It's a new Original Craizee Corner pattern so I can't share it until I get it all finished and written up. But Tyler loves it and I hope you will too.
2. I decided on a single fabric border and didn't order it until Sunday. Here's what I am using for the border.


This fabric is from the other colorway in the Heart Garden line called Beloved Heart Garden. I want the border to pull any red out of the snakes to make it pop more.  

But I do plan on finishing this quilt this weekend. I am going to send it to my Mom for Valentines Day. 

I also want to share an email I got from a follower yesterday. Alyce wrote me:

Awww, so pretty!!
I just wanted to share my creation from last night inspired by your mug rug yesterday
!
http://justsewblossom.blogspot.com/2012/01/valentines-mug-rug-candy-love-hearts.html


I was so excited to learn that Alyce used Monday's tutorial to make her own mug rug. She modified it a bit, which I think is awesome and something I do often. They say imitation is the sincerest form of flattery, well this just about knocked my socks off! As a blogger you never know if anyone's really reading the blog or if you are reaching anyone. This totally made my day, along with the other great comments y'all left this week. If you make any of these projects I'd love to hear and see them too :) 

Here's my question for today, what would you make if you won this awesome FQ bundle of Darling Heart Garden from the Fat Quarter Shop?

Come back tomorrow for another V-Week project. I have to tell you a secret...It's not done yet. I am taking a class tomorrow and that will be the last project for the week.

I'm a Snake Charmer Now

If you are looking for the Darling Heart FQ bundle giveaway click here.

I admit it...I am a new snake charmer :)

No I don't mean real snakes (just the fact that I can type that word is a big step for me) but I did charm some charm squares into a cute quilt top.


I used the Snake Charmer pattern by Little Louise Designs. The great thing about this pattern is that its available as a PDF from The Fat Quarter Shop! This is my favorite way to purchase patterns. I can save them to IBooks on my Ipad and have it ready whenever I need it.

Instead of a charm pack, I used 7 FQ's from my Darling Heart Garden FQ bundle and made it a little wider and longer. The pattern is so easy that adding to the quilt is easy. There's no real quilt math to do.

And it uses one of my favorite techniques, connectors. If you missed my connector tutorial you can find it here.

You might have noticed that it's not all the way done yet, there's 2 reasons for that (aka my excuses):
1. I have been slaving away trying to finish my son Tyler's quilt before he goes back to school. I'm very sad to say that I did not accomplish that goal, but I'm very close. All I have left to do is the binding. It's a new Original Craizee Corner pattern so I can't share it until I get it all finished and written up. But Tyler loves it and I hope you will too.
2. I decided on a single fabric border and didn't order it until Sunday. Here's what I am using for the border.


This fabric is from the other colorway in the Heart Garden line called Beloved Heart Garden. I want the border to pull any red out of the snakes to make it pop more.  

But I do plan on finishing this quilt this weekend. I am going to send it to my Mom for Valentines Day. 

I also want to share an email I got from a follower yesterday. Alyce wrote me:

Awww, so pretty!!
I just wanted to share my creation from last night inspired by your mug rug yesterday
!
http://justsewblossom.blogspot.com/2012/01/valentines-mug-rug-candy-love-hearts.html


I was so excited to learn that Alyce used Monday's tutorial to make her own mug rug. She modified it a bit, which I think is awesome and something I do often. They say imitation is the sincerest form of flattery, well this just about knocked my socks off! As a blogger you never know if anyone's really reading the blog or if you are reaching anyone. This totally made my day, along with the other great comments y'all left this week. If you make any of these projects I'd love to hear and see them too :) 

Here's my question for today, what would you make if you won this awesome FQ bundle of Darling Heart Garden from the Fat Quarter Shop?

Come back tomorrow for another V-Week project. I have to tell you a secret...It's not done yet. I am taking a class tomorrow and that will be the last project for the week.

Saturday, January 14, 2012

My Week

It's been a strange week, but I finally got my quilting mojo back and got quite a bit done. I can't go into all the details, but I can show you a few things. All I can tell you is that I have joined some swaps and committed to a few blog hops, as well as planning out the rest of January and February.

Here's part of a table runner I made for The Berry Patch. The colors are much brighter in person. I still need to put on the binding. This is made using my table runner pattern. I hope to have this done today.


Here's a table runner I have been working on. This is going to be part of the Quilter's With Modern Tools Valentines Blog Hop. I still have to do some applique in the center.   


I also started working on my first Dresden Fan/Plate this week. Next week is Nifty Notions Cut For The Cure Ruler week. This month's ruler is the 22.5 degree wedge so you will be seeing quite a few things like this all week long.


I've also been working on Tyler's quilt this week. I just need to put on the borders and quilt and bind it. I have 1.5 weeks to get it done so I am confident he will be going back to Johns Hopkins with a nice warm quilt. He helped me design it, I am calling it Floating Squares. I will have a tutorial for it sometime this month, but I couldn't wait to show it to you!


Did I mention it was Valentines week in my house? Or I felt like it was since I got all my Valentines fabric out and started on some mug rugs, the table runner and this quilt. It's the Snake Charmer quilt pattern. There will be black in between the rows. I am going to bring this to Sit and Sew at the Berry Patch today to work on.


With all the football games on this weekend (Go GIANTS!!!) I will have plenty of time to get more done.

What did you do this week? I'd love to see it.


My Week

It's been a strange week, but I finally got my quilting mojo back and got quite a bit done. I can't go into all the details, but I can show you a few things. All I can tell you is that I have joined some swaps and committed to a few blog hops, as well as planning out the rest of January and February.

Here's part of a table runner I made for The Berry Patch. The colors are much brighter in person. I still need to put on the binding. This is made using my table runner pattern. I hope to have this done today.


Here's a table runner I have been working on. This is going to be part of the Quilter's With Modern Tools Valentines Blog Hop. I still have to do some applique in the center.   


I also started working on my first Dresden Fan/Plate this week. Next week is Nifty Notions Cut For The Cure Ruler week. This month's ruler is the 22.5 degree wedge so you will be seeing quite a few things like this all week long.


I've also been working on Tyler's quilt this week. I just need to put on the borders and quilt and bind it. I have 1.5 weeks to get it done so I am confident he will be going back to Johns Hopkins with a nice warm quilt. He helped me design it, I am calling it Floating Squares. I will have a tutorial for it sometime this month, but I couldn't wait to show it to you!


Did I mention it was Valentines week in my house? Or I felt like it was since I got all my Valentines fabric out and started on some mug rugs, the table runner and this quilt. It's the Snake Charmer quilt pattern. There will be black in between the rows. I am going to bring this to Sit and Sew at the Berry Patch today to work on.


With all the football games on this weekend (Go GIANTS!!!) I will have plenty of time to get more done.

What did you do this week? I'd love to see it.